
I don’t know about you, but I find myself switching AI models (surprise Gemini release anybody?) and clients (Cursor, Windsurf, Cursor again—no, wait!) pretty often.
What frustrates me more than anything is loss of context. I’m constantly explaining to the AI what it needs to know about my problem and trying to get it to act in “my style” of doing things.
But what if that context were portable? What if you could ask a question in Claude Desktop, get an answer, and then recall the conversation later in Cursor when coding?
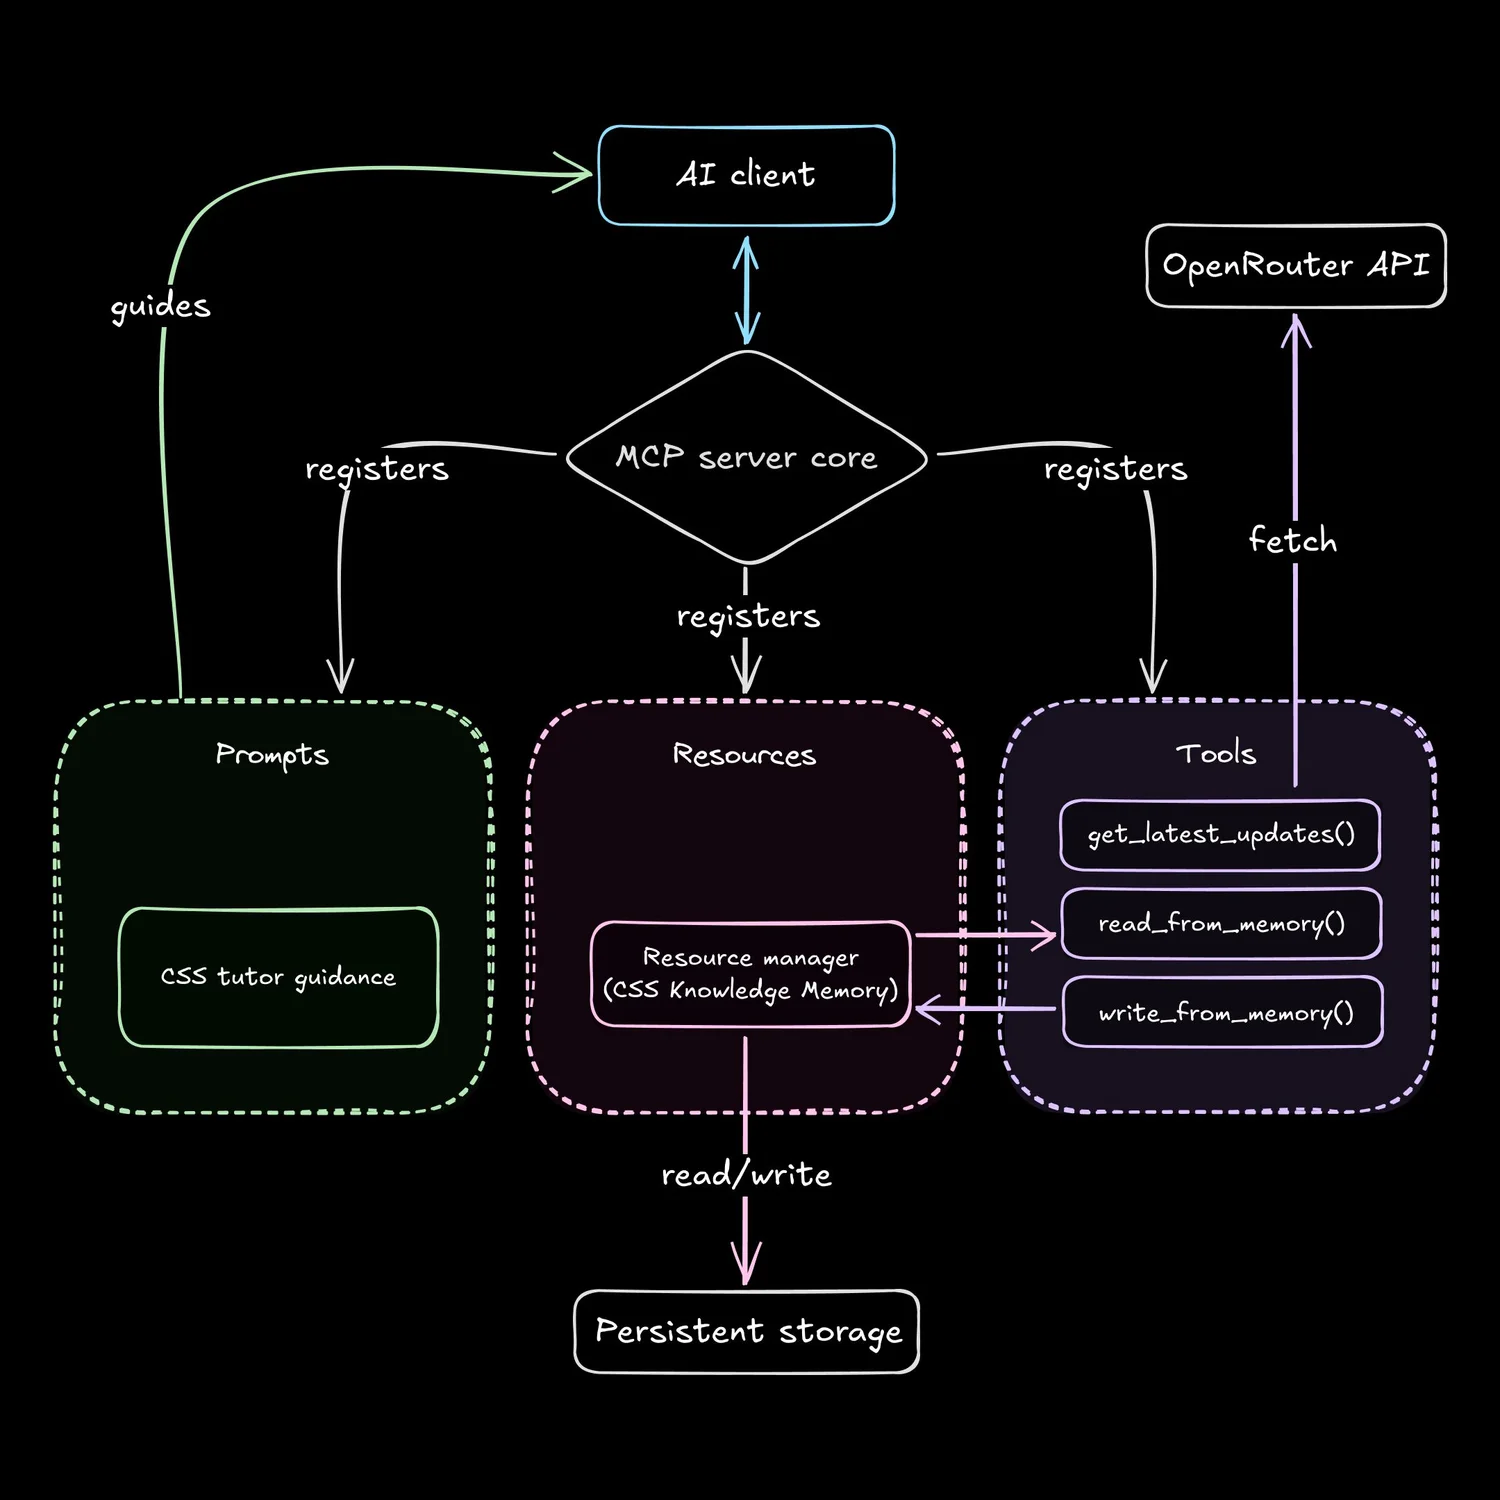
In this article, we’ll do just that, building out the tooling together in just a few quick steps. Here’s how the final product will look:
Here’s the complete code for this example project so you can clone it. I recommend following along; the goal is that by the end of this tutorial, you’ll be able to create your own lil’ dream server.
What you’re seeing above is, as you may have guessed from the 48px title and borderline-absurd keyword optimization of this post, a Model Context Protocol (MCP) server.
If you already know all about MCP and want to get to building, feel free to skip this section and head on down to the “Quick Start.” Otherwise, set your stopwatch—here’s the 3-minute primer.
If you want autonomous AI agents, you’re gonna need tools that enable them to see and interact with the world around them. Unfortunately, connecting AI assistants directly to tools makes for fragile integrations; update the AI model or the API on either side of the tool, and you get broken code.
So, how can we build more robust, reusable AI capabilities?
One route is through Anthropic’s Model Context Protocol (MCP). It’s a standardized communication layer (based on JSON-RPC) that allows AI clients (like Cursor) to discover and use external capabilities provided by MCP servers.
These capabilities include accessing persistent data (Resources), performing various actions in the outside world (Tools), and receiving specific instructions on how to use those resources and tools (Prompts).
For a full exploration of MCP's goals, architecture, and potential, you can read my deep dive.
That’s great, but…
Clients like Cursor, Windsurf, and Builder.io’s Fusion already have great AI agents without MCP. So, why do we need more tools?
Put simply, client developers can’t build everything. They don’t want to spend all their development hours tweaking web search for every new model, and they’re definitely not out here trying to roll their own Jira integration.
MCP lets service providers like GitHub, Notion, or Linear maintain their own AI integrations, which means higher-quality interactions and less duplicated effort.
Take a look at this example using Fusion:
So, when you opt into using an MCP server, the main benefits you get are future-proofing and portability. You get an enormous ecosystem of plug-and-play tools that you can bring to any chat window that implements the standard.
Okay, but…
Even if you’re not a developer who needs to wire up their own service API to MCP, there are a lot of benefits to having the knowhow.
For me, I’ve noticed that the more I spend time building servers, the less I feel like my entire job is just copy/pasting huge swaths of text between input boxes. I’m automating context, and it makes AI models more personally useful to me.
Plus, it feels like a way to put a stake in the ground with the ever-shifting landscape of AI. Tools I build today should keep working even as new models, clients, and services come around.
But enough waxing poetic. Time to roll up our sleeves.
I’m not gonna lie: If you want to just hand the AI agent the MCP docs and tell it what functionalities you want… well, it’s probably gonna work. This is the kind of code AI is especially good at—it’s boilerplatey.
Use the MCP Inspector as you go, and keep feeding errors back to the AI. And check out our best Cursor tips to get the most out of the AI agent.
Otherwise, here’s the breakdown for those who want to learn how the architecture works, in order to build scalable AI tools.

Let's get the code base ready with these three steps. We won't worry about API keys or client setup yet.
- Clone the Repository: Get the example code onto your local machine.
- Install Dependencies: We need the MCP SDK and a few other libraries.
- Build the Code: Compile the TypeScript source code into runnable JavaScript.
You now have the compiled code in the build/ directory.
If you want to grab an OpenRouter API key and head on down to “Running the server with real clients,” you’re more than welcome to. The server will work as is.
Before we dive into the specific features of this CSS Tutor example, let's nail down the fundamental structure of any MCP server built with the TypeScript SDK and get a minimal version running.
Open the main server file: src/index.ts. You'll see these key parts:
- Imports: The file brings in
McpServer(the core server class) andStdioServerTransport(for communication) from the@modelcontextprotocol/sdk. - Registration imports: We import
registerPrompts,registerResources, andregisterToolsfrom other files in thesrc/directory. These functions (which we'll explore later) are responsible for telling the server about the specific capabilities we want to give it. - Server instantiation: We create the server instance, setting the server's name and version, and initializing empty placeholders for its capabilities.
- Calling registrations: The imported
register*functions are called: These calls populate the server instance with the actual tools, resources, and prompts defined elsewhere. - The
mainfunction: This async function sets up the communication transport and connects the server: - Execution: Finally,
main()is called with basic error handling.
This structure is the heart of the server. It initializes, registers capabilities, and connects for communication.
To make sure this core loop works without needing any external APIs or complex logic yet, let's temporarily modify src/index.ts:
- Comment out the capability registration calls:
- Add a simple "hello" tool right before the
mainfunction definition: - Re-build the code:
With just these changes in src/index.ts, we now have a runnable MCP server that offers only one basic tool. It doesn't do much yet besides offer Empire Strikes Back spoilers, but it confirms the core structure and communication setup is working.
Now that we have a minimal, runnable server, how do we check if it's actually speaking MCP correctly? We use Anthropic’s MCP Inspector.
This command-line utility acts as a basic MCP client. It launches your server process, connects to it via standard I/O (just like Claude Desktop or Cursor would), and shows you the JSON-RPC messages being exchanged.
From your project's root directory, run:
npx @modelcontextprotocol/inspector node ./build/index.jsnpx ...inspector: Downloads and runs the inspector package.node: The command to execute your server../build/index.js: The path to your compiled server entry point.
The inspector will start, connect to your server, and begin exchanging messages. If you go to the localhost url, you can interact with it:
- Connection: You'll see
initializemessages confirming the connection. - List tools: Use the inspector's interface to ask the server what tools it offers. You should see only our
hello_worldtool listed. - List resources/prompts: If you try to go to the resources or prompts tabs, they should be unclickable, since we commented out their registrations.
- Call the tool: Use the inspector to call the
hello_worldtool. You should see the server respond with our custom message.
The MCP Inspector is your best friend during development. After each step where you add or modify a capability (tool, resource, or prompt), verify that the server registers it correctly and responds as expected. The Inspector lets you test server functionality without involving a full AI client.
Use the buddy system: anywhere you go, the MCP Inspector goes.

(^ Live footage of you and the MCP Inspector.)
Now that we have the basic server running and know how to debug it with the Inspector, let's 1) grab some snacks, and 2) incrementally add the actual CSS Tutor features.
Feel free to tweak the capabilities as we go along—all coding skills are welcome!
First, let's activate and understand the tool that fetches external information.
In src/index.ts, remove the dummy hello_world tool definition we added earlier, and uncomment the line registerTools();. This line calls the function in src/tools/index.ts that registers all our tools.
export const server = new McpServer({
  name: "css-tutor",
  version: "0.0.1",
  capabilities: {
    prompts: {},
    resources: {},
    tools: {}
  }
});

// registerPrompts();
// registerResources();
registerTools();

// delete dummy tool

async function main() // rest of codeNow, open src/tools/index.ts and find the registerGetLatestUpdatesTool function. This is where the get_latest_updates tool is defined and registered with our server.
Inside this file, you'll see a few key things happening:
- Configuration & safety check: It uses
dotenvto load environment variables, specifically looking forOPENROUTER_API_KEY. If the key is missing, it logs a warning and skips registration, preventing the server from offering a tool that can't function. - Tool registration: It uses
server.tool()to register theget_latest_updatestool. This includes giving it a name, a description for the AI client, and defining its input schema (in this case,{}because it takes no arguments). - Core logic (Handler): The core logic is in the asynchronous handler function passed to
server.tool(). This handler is responsible for:
- Constructing and sending an HTTP POST request to the OpenRouter API (
https://openrouter.ai/api/v1/chat/completions) usingnode-fetch. - Including the necessary
Authorizationheader with the API key. - Providing specific prompts to the
perplexity/sonar-promodel to ask for recent CSS updates. - Performing basic error checking on the API response.
- Parsing the JSON response and extracting the relevant content.
- Formatting the final output into the standard MCP message structure (
[{ type: "text", text: ... }]). Basictry...catcherror handling is also included.
- Activation: Finally, the main
registerToolsfunction (at the bottom of the file) ensures thatregisterGetLatestUpdatesTool()gets called when the server starts up.
Compile the changes.
npm run buildTo test this tool with the Inspector, the server process needs the API key. Prefix the inspector command:
# Example on Linux/macOS
OPENROUTER_API_KEY="sk-or-..." npx @modelcontextprotocol/inspector node ./build/index.js(See the project's README.md for Windows examples).
Run the MCP Inspector. Use tools/list. You should now see get_latest_updates registered. Try calling the tool via the Inspector—it should return recent CSS news! (As long as you have ~$0.04 in credits from OpenRouter available.)
Now, let's activate the components that allow our server to remember information across interactions: the css_knowledge_memory resource and the tools to interact with it.
Back in our main file (src/index.ts) uncomment the line registerResources();.
Open up src/resources/index.ts and find the registerCssKnowledgeMemoryResource function.
- Registration: It uses
server.resource()to define thecss_knowledge_memoryresource. This gives it a name, a unique URI (memory://...), read/write permissions, and an asynchronous handler function. - Core logic (handler & helpers): The handler function is called when a client wants to read the resource's current state. It uses helper functions (
readMemory,writeMemoryalso defined in this file) which handle the actual file system operations: reading, parsing, validating (with Zod), stringifying, and writing data to thedata/memory.jsonfile. This file acts as our persistent memory store. - Activation: The main
registerResourcesfunction (at the bottom of the file) ensures thatregisterCssKnowledgeMemoryResource()gets called when the server starts.
Next, head on over to src/tools/index.ts and look at the registerReadFromMemoryTool and registerWriteToMemoryTool functions within src/tools/index.ts. These provide the actions clients can take related to the memory resource.
- Registration: Both tools are registered using
server.tool().read_from_memoryhas no specific input schema, whilewrite_to_memorydefines an input schema using Zod ({ concept: z.string(), known: z.boolean() }) to ensure clients send the correct data format for updates. - Core logic (handlers): The
read_from_memorytool's handler simply calls the importedreadMemory()helper fromsrc/resources/index.tsand returns the current state. Thewrite_to_memorytool's handler receives validated arguments ({ concept, known }), then uses bothreadMemory()andwriteMemory()helpers to load the current state, update it based on the input, and save the modified state back todata/memory.json. - Activation: The main
registerToolsfunction ensures these tool registration functions are called.
Compile the changes.
npm run buildRun the MCP Inspector.
- In the Resources tab, you should now see
css_knowledge_memoryregistered. - In the tools tab, you should see
get_latest_updates(from Step 1) plus the newread_from_memoryandwrite_from_memorytools. - Verify the statefulness: Use the Inspector to call
read_from_memory, thenwrite_to_memorywith some test data (e.g.,{ "concept": "Grid", "known": true }), and finally callread_from_memoryagain. Confirm that the data returned by the second read reflects the change you wrote, and check thedata/memory.jsonfile directly to see the persisted update.
Last step! Time to tell the AI model how to use the tools and resource we’ve provided.
In src/index.ts, uncomment the last commented-out line, registerPrompts();.
Open src/prompts/index.ts.
- Registration: The
registerCssTutorPromptfunction usesserver.prompt()to define thecss-tutor-guidanceprompt, giving it a name and description for the client. It specifies no input schema ({}) because calling this prompt doesn't require any arguments from the client. (We could pass dynamic data here, which can get pretty spicy.) - Core Logic (Handler & Content): The handler for this prompt is very simple. It just returns the content of the
cssTutorPromptTextconstant (defined in the same file), which contains the detailed instructions for the AI on how to behave like a CSS tutor using the available tools and memory. - Activation: The main
registerPromptsfunction (at the bottom of the file) makes sureregisterCssTutorPrompt()gets called when the server starts.
Compile the changes.
npm run buildRun the MCP Inspector.
- In the Prompts tab, you should now see
css-tutor-guidanceregistered. - Try calling the prompt from the Inspector. It should display the full guidance text defined in
cssTutorPromptText.
Pretty cool, right? Well, here’s the thing: Even though the server now offers the prompt via MCP, most clients can’t automatically use MCP prompts. Claude will need you to pick it manually, and Cursor can’t even access MCP prompts yet.
So, for now, rely on features like Cursor rules to provide instructions on how to use certain MCP servers. Hopefully, we’ll see more MCP adoption soon.
With our server fully built and debugged using the Inspector, it's time to connect it to actual AI clients.
If you use the Claude desktop application:
- Go to Settings. Not the settings near your profile (for some reason?), but the actual app found in the top toolbar.
- Go to “Developer” → “Edit Config”
- Add an entry for the
css-tutorserver: - Replace the absolute path (not relative!) and API key with your actual values.
- Restart Claude Desktop, and connect to the
css-tutorserver. (See video up top for where to press.)
If you use the Cursor editor:
- Go to
Cursor Settings>MCP>Add new global MCP server. - Configure the server the exact same as in the Claude steps above.
- Create prompt rule: Cursor doesn't automatically use the server's MCP prompt, so to create a rule, go to
Cursor Settings>Rulesand add a new Project Rule with the pasted prompt from the server. - Activate the rule: When chatting or generating code (e.g., Cmd+K) in Cursor within this project, you need to
@mention the rule, and then Cursor’s agent can use the server as intended without further guidance.
You should now be able to recreate the demo video scenario, chatting with one client and then moving to the other whenever you want.
First, pat yourself on the back. New skills are awesome.
Second, think about the implications.
This CSS Tutor example is simple by design, to help you learn the power of MCP as quickly as possible—but imagine what you could do with some real tools.
Maybe you want:
- More sophisticated state: Replace the JSON file with a proper database (like SQLite or PostgreSQL) for multi-user support or larger datasets.
- Additional tools: Add tools to search specific documentation sites (like MDN), fetch CSS examples from Codepen, or even analyze a user's local CSS file.
- Dynamic prompts: Instead of a static prompt, make the guidance adapt based on the user's known concepts stored in the resource.
- Error handling and rerouting: Add more granular error handling, especially for external API calls, and reroute logic when one service is down.
- Different Transports: Explore other transport options besides
StdioServerTransportif you need network-based communication—e.g., Server-Sent Events (SSE) for streaming.
MCP provides a pretty powerful framework to make whatever you want. By building MCP servers, you can make tailored, stateful, and future-proof integrations that connect to any new assistant that speaks the protocol.
Happy building!